

LPI 101-500 - LPIC-1 Exam 101, Part 1 of 2, version 5.0
Which of the following commands print the current working directory when using a Bash shell? (Choose two.)
When planning a partition scheme, which of the following directories could be considered for separate partitions? (Choose three.)
Which of the following commands are common Linux commands for file management? (Choose three correct answers.)
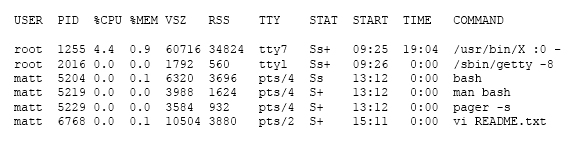
Which of the following commands will produce the following output?
Which command reads and displays the current contents of the Kernel Ring Buffer on the command line? (Specify ONLY the command without any path or parameters.)
Which utility would be used to change how often a filesystem check is performed on an ext2 filesystem without losing any data stored on that filesystem?
Which command is used to create and initialize the files used to store quota information? (Specify ONLY the command without any path or parameters.)
After running the command umount /mnt, the following error message is displayed:
umount: /mnt: device is busy.
What is a common reason for this message?
Which of the following information is stored within the BIOS? (Choose TWO correct answers.)
During a system boot cycle, what is the program that is run after the BIOS completes its tasks?